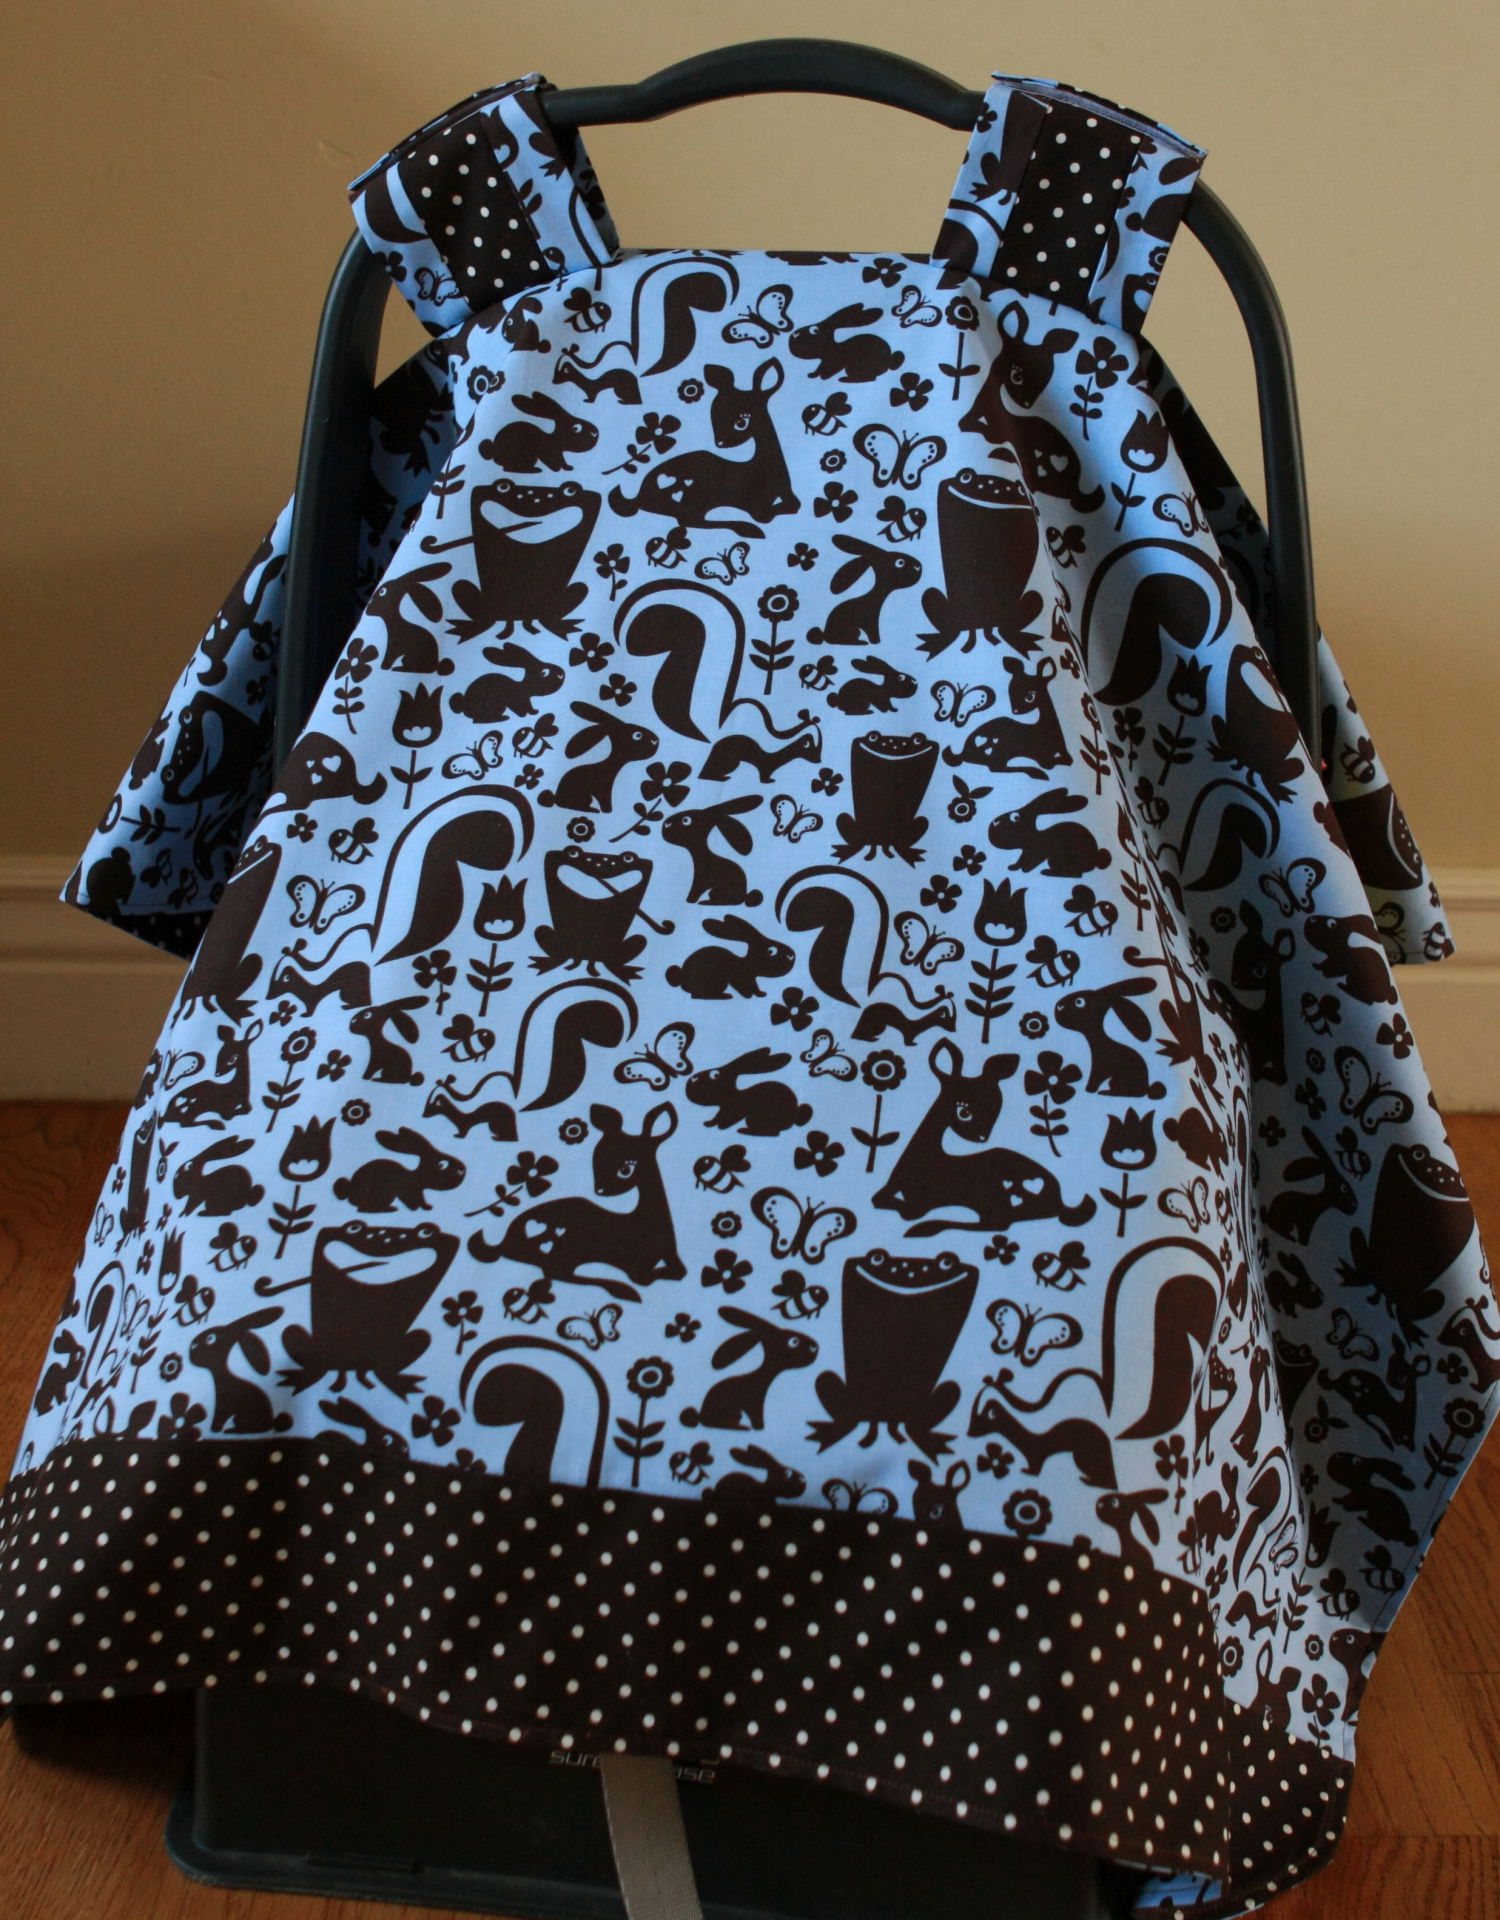
This car seat cover was a quick, fun project for me. It makes a perfect gift for a new baby. Mine is for my new baby nephew, Isaac. A cover is wonderful for keeping a baby asleep, warm and safe from germs when out in public.
This is a project where you can definitely employ your imagination to embellish it as much or as little as you want. I chose to piece a strip of my back polka dot fabric on the front top and bottom. I also pieced the straps… but that was out of necessity. I only bought 1 yard of the backing fabric, and didn’t have enough fabric complete the straps like I wanted, with backing fabric on one side and front on the other… so I pieced them, and in the end I liked them better than the way I had planned. I love when this happens. I make a mistake or run out of fabric, and the fix ends up being my favorite part of the project. I think it’s because I’m forced to think out of the box and get more creative.
Here is what you need to complete this project:
- 1 1/3 yards 100% cotton fabric or flannel for top
- 1 1/3 yards 100% cotton fabric or flannel for backing
- Sew on Velcro (I prefer not to use Velcro with adhesive, as it gums up my needle.)
- fabric marking pen (either water erasable or disappearing) or fabric marking pencil
And here’s how:
1. Cut top and backing fabrics 35″ wide x 42″ long. If fabric has a directional pattern like my top fabric, make sure to cut it so it goes in the right direction. If you are piecing either the top (like I did) or backing, make sure the finished dimensions are still 35″ wide x 42″ long.

2. Create curved corners by placing a bowl in the corner and tracing with fabric marking pen or pencil, as shown. Cut along tracing line. (This curved corner is more than just decorative, it serves to keep the cover off the ground on the corners. Next time around, I would use a larger bowl and take more off for the curve, as the corners in the front of the car seat touch slightly.)

3. Cut straps 2 from backing and 2 from top 4″ x 9 1/2″. (I was piecing the straps, so my “back” polka dot fabric was 2″, and the “top” fabric was cut 6″ thereby making my finished strap the same dimensions.)
4. If you want to do any piecing (like I’ve done), make sure finished dimensions are same as above.

5. For the main body of the cover, place right sides of front and backing together, stitch together using a 1/4″ seam, leaving a small opening. Note: all seams are 1/4″ unless otherwise noted.

6. Clip curved corners and turn right side out. I like using a chopstick all the way around the seam, as it makes for a nice edge. Press well.

7. Using a scant 1/4 seam, stitch all the way around the outside edge to give it a finished look, and to close the opening.

8. To make the straps place right sides of front and back fabric together. Stitch around, leaving one end open. (There are few added steps if you are making the straps pieced on top, like mine. I stitch down the length, leaving both ends open, I pressed the seams out, turned it right side out, and pressed so the straps looked even. Then I turned it wrong sides together again and closed one end. Then continue to step 9)

9. Clip corners and turn right side out. (Again I use chopstick) Press well.
10. Close opening. Repeat steps 8-10 for second strap.
11. Fold straps to check placement of Velcro, pin and stitch into place. I made sure the end which I closed the opening was on the inside and therefore hidden.

12. Press straps in half, to act as a guide. For placement of stitching on the straps (to adhere the straps to the body), measure 4 1/4″ inches in from both sides and draw a line with fabric marking pen as shown below.

13. For placement of straps measure 19″ inches from the top and 11 1/2″ from each side. There should be about 5 1/2″ between each strap and about 21″ from the strap to the bottom. If you are visual like me, see Illustration for strap placement. Pin straps into place. Stitch and then reinforce stitching. (The stitching will be one inch apart, and I stitched in a box shape.)

And it’s done! Remember, you really can use your imagination to embellish this cover. You can add buttons, rickrack, or ribbon. As usual, I like simplicity, and the piecing was enough embellishment for me.

Here’s a quick glimpse of the inside.

Now it’s time to wrap it up and deliver it to my dear sweet nephew.
What a great baby gift, thank you for the tutorial.
love this. i am wanting to learn to sew. think this is too much for a new-new-newbie? hahaha… (p.s. do you have a Facebook page or e-mail subscription? love the site!)
This would be a great beginning project. The hardest part will be cutting, and I highly recommend a rotary cutter and mat for that. Let me know if you have any questions about the instructions.
I didn’t answer your question about the facebook or email subscription. I have a facebook page but am dismally bad at ever going there or using it. The best way to follow me by clicking on the RSS feeds link on my right hand column.
I ADORE this and I ADORE this fabric? Where did you get it?
The fabric comes from Elaine’s Quilt Block in Salt Lake City. It’s a Michael Miller called Grass Menagerie. The polka dot which matches perfectly is a Michael Miller fabric too.
[…] of Make It Do shares how to sew a car seat cover to help shield your wee one from cold temperatures, wind, sun and […]
Thanks for the tutorial. I was going to buy one of these at a local shop so I could figure out how to make them. I have 4 babies to make them for so it will be great!! Heading to the fabric store. Thanks again!!
Have to link you at my blog.
What a great tutorial you have shared with us all.
Thanks for posting this awesome tutorial!! I just finished making one for our upcoming baby! I’ve been wanting to make one and your tutorial made it a breeze!
Thanks so much for these easy to follow directions! I finished mine today and it turned out so cute! I also linked you from my website.
You’ve got a lot of fun ideas on here! I’ll be back
I made one! here is the link.
http://beadsfabricandpaper.blogspot.com/2010/01/i-made-car-seat-cover-for-sleepyhead.html
Thanks for these directions I’m going to try it this weekend! Great Blog.
Thank you so much for sharing this tutorial. My daughter who expecting, sent me to this website and I am so glad she did. I will be making one of these for my new granddaughter with Michael Miller fabrics as well. I love their fabric line. THis blog is now on my favorites list.
my mom and I made this tonight. It was super easy…and my first sewing project ever! With her help, we managed to finish it in one afternoon. We tinkered with the measurements to fit the carseat a bit, but it still came out super cool.
Question for ya… Can I do cotton on one side and flannel on the other? And if I do that, should I prewash? I’m kinda a beginner so I don’t really know what I’m doing but I want to make it a bit warmer. Thanks for the great tutorial!
I would recommend pre-washing the fabric if you are using flannel on one side. Flannel tends to shrink more than other fabrics… so you want to get that out of the way first. After washing, make sure to press the fabrics well, then there is no problem with using the two together. Good luck. This is a great project for a beginner, especially if you don’t piece the top like I did.
This is great. I’m showing this to my wife now and she is loving it. She will defininitely make this for our new grand baby.
This was fantastic! I’ve just made one for our first! I am by FAR a nervous and novice seamstress and I felt super confident in my abilities after following your tutorial! Thanks a million for making my (soon to be born) son a “looker” in his carseat!
Lovely, adding to my to-do list for a great frien currently having a summer baby.
So glad I found this! I saw them at a store for $35 each. I only bought 1 yard of each fabric. I cut the 35 inches from both and then cut 6 inches from each remaining strip to add to the bottom of the both front and back. That way, both front and back have contrasting fabric on the bottom.. I still had enough to make straps!! So it can be done with just 2 yards of fabric. Thank you – it turned out darling!
I am loving this tutorial!! Thanks for posting it. I do have a question for you, when you pieced the front, how big of a section did you cut for the bottom? I love that look!
I am also loving this fabric! I am making one in the same pattern, just in the pink instead of the blue for a good friend. I LOVE IT!!
I have 3 friends that just had babies or are about to have a baby and I am making one for each of them!
Hi Kami, it was about a 4″ strip at the bottom. I gave it away as a gift, so I don’t have exact measurements…. that is very close. good luck, Calli
[…] For a gift, I made her a car seat cover from the tutorial I made in January. […]
I just made this using your tutorial and it was great! Thank you so much! It was super simple to follow your directions and I love my car seat cover! I linked to your page on my blog when I posted about the one I made. Thanks again!
I cant wait to give it a try, darling idea. Thanks
What a great idea for a baby gift. I thought you’d like to know I added a link to your blog on the homemade baby gifts page of my baby gift ideas site. Thanks for the great tutorial!
nice post, thx
Hello. I made this project for a friend of mine at it turned out perfect. Thank you so much for the tutorial. I was wondering if you would give me permission to make and sell these car seat covers at a craft fair in my town. Thank you once again for the fantastic tutorial. :)
Julie, This was a free tutorial, and you are more than welcome to make them for sale. I really appreciate you asking! I wish you success! cheers, Calli
Thank you very much!!!
When you say you use a “chopstick for the edge” what exactly does that mean?
Hi Amy, I run the chopstick (which has a pointed, yet blunt tip) around the inside of the seam of the body of the cover. It makes the seam neat and crisp. You can buy a tool called a point turner… but a chopstick does a great job and doesn’t cost me anything. I hope that makes sense! cheers, Calli
oh, ok. I get it now. Thanks!
This is so adorable. I am a newbie at sewing (my husband bought me a sewing machine for my birthday!) and will attempt to make this as my first project. The tutorial I know will def help.
Thank you so much for sharing your project….love it!! I’m getting ready for new granddaughter in January and it’s on my list to make. You really explained things in your tutorial and it is much appreciated.
[…] For a gift, I made her a car seat cover from the tutorial I made in January. […]
thanks for the tutorial! love it !
actually i love velvet clothe seat covers because they are very comfortable to touch:
i love baby gifts and i love to give baby gifts to my baby and also the my sister’s baby `*”
A wonderful tutorial, thank you!
I just completed one for my new grandson, I added an applique inside the front cover, just incase he is awake, I thought he should have something to look at.
This will be a project I make again, a beautiful and practical gift. How perfect is that!
marcia
WOW!
That is beautiful to say the least!
The fabric you used is just ever so cute and the finished product and detail in the process is perfect!
Do you market these?
Have you considered doing so?
Love this but I am having a problem placing the straps. If it is 42 inches in length and I place the top of one strap 19 inches from the front and my strap is 8.75 inches, there isn’t 21 inches on the other side. What am I reading wrong?
Any help would be so appreciated, as is this tutorial.
Hi Jacquie, You are only tacking down a small section of the center of the strap, in a box shape. So I didn’t include the entire strap in my calculations. I hope that makes sense. I should think about reworking my diagram to show that more clearly. Good luck! Calli
Sorry Calli. I didn’t see my message go through. Thank you for all your help. This is a great tutorial. I love it. Have a super day.
I love this but I need help on placing the straps. The length is 42 inches. If I place one strap 19 inches in and the strap is 8.75 inches, that doesn’t leave 21 inches on the other side.
I must not be reading this right. Can you explain it to me? I would so appreciate any help.
Great article. I will link to my website.
This is great!!! I love your colors and excellent directions! Off to the fabric store.
What a wonderful idea. My daughter is expecting twins and the car seats they purchased from the hospital dont have any canopy. One question, they are Evanflo and have a ergonamic L shaped handle. If I follow this pattern, wont it be lop-sided?
Yes they will be lopsided, but it can be remedied. I would adjust them by pinning until they seem like they are in the proper position… and then sew them into place. Good luck! It’s a lot of work to have twin babies (especially with a toddler like I did) but they are so wonderful! I love having my twins!
Hey Calli,
I found this post through StumbleUpon and i`m so happy i did. Being a baby car seat cover junkie i`m gonna try to make one this weekend.