Hi, I’m Calli
Welcome! If you enjoy your visit, be sure to follow me:
Oh My Stars!
Canning Day Quilt

Archive for the ‘make it’ Category

Telephone Can Do

This post was originally created for Skip to My Lou’s Craft Camp.  I am running it today so the tutorial is here on Make it Do too.

Today I’m sharing a project that most of us have made or tried at least once in our life.

It’s the original, “Can you hear me now?”

No, not a cell phone… but a Can Phone.

In our world of high tech gadgets, a can phone is as low tech as it gets.  Most kids today have never even heard of one before.  It good to know that some things don’t change,  and just like when we were kids, a can phone still provides hours of fun.  What could be better than sitting across the yard on a summer afternoon telling your sister secrets and knock knock jokes?

But first you’ve got to make your phone.  I’m not sure which my kids enjoyed more, creating or using their phones.  Here’s how:

To make can phones you will need to cans or cups and a long string.  That’s it.  I told you it was low tech.

But since we love to craft at our home, we also spruced our phones up a bit.

We used only what we had on hand, a little scrapbook paper and some cut out paper butterflies to cover our cans using Mod Podge.  My girls LOVE Mod Podge.

The best part about a can phone is you can use whatever fun decorations you have on hand…. stickers, ribbon, or crayons.

My girls kept it simple with just the butterflies and a little rickrack for fun.  When my girls had their cans just the way they liked them, we set them aside to dry.

Once dry, I poked a small hole in the bottom center of each can.  You can use a nail or an awl with a hammer.  Make sure the hole is small, just barely big enough to put the string through.

You’ll need a long string.  The type of string isn’t important, just be sure it’s something that doesn’t stretch too much so you can pull it taut.  A taut string is the key to this project working.

My kids wanted a long string, so we used about 40 feet.  The distance also doesn’t matter so much either, so long as the string is taut. I think you can go as long a 100 feet and still have it work.

Thread the end of the string through the hole in the can and tie it in a large tight knot.  Because my string was nylon, I used a flame to burn the end and keep it from fraying.  Repeat for the other can, and your “phone” is done.

The kids experimented and found it worked only when the string was straight and tight.  It didn’t work going around corners and doors in the house.  But when it’s straight….

“It WORKS!”  I just heard her! 

“Which Looney Tune character says swear words?”   Gee, I don’t know.

“The ROAD RUNNER!”  “Beep beep!”

Oh, to be young again, and telling 3rd grade jokes on a can phone.  That is the life.

Happy summer crafting everyone!

Tie Dye Fun for the 4th

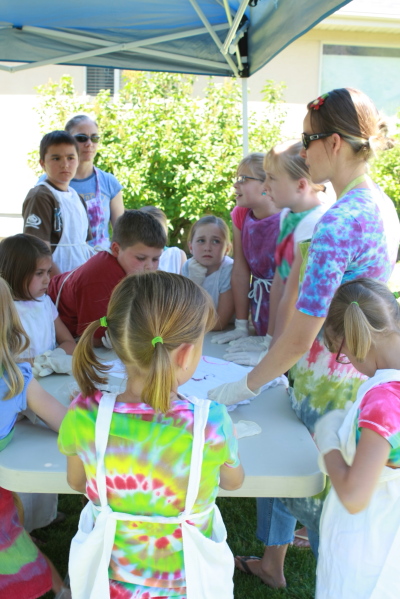
This past week we got together with our cousins for a little tie dye activity.

We invited Jen, a tie dye expert, to come teach us how to tie dye.

Jen has been tie dying for a long time… she estimated she has dyed well over a thousand items.  She was so organized and knowledgeable it made our day incredibly fun… and not stressful in the least.

Jen started by having us toss our tees into a tub with water and sodium carbonate which is the main ingredient in washing soda.

We all provided our own tees.  The only criteria was they needed to be 98 – 100% cotton, but it really can be any natural fiber to take the dye.

The best part about tie dye is that you can “rescue” a stained or old shirt by giving it new life with dye.  Just carefully dye over the stain and voila… just like new.

The shirts only need a two minute soak… then we wrung them out….

And tossed them up on a drying rack.  The dye on a tee that is too wet will run all together.  Totally dry and the die will not soak in well.

Once the shirts are damp dry…

It was time to fold the shirts.  This was a cool method.  Lily is making a swirl by sticking a fork into the spot she wants the swirl to start, and then twisting.  Jen is making sure the shirt sort of folds neatly around the swirl.

Jen was amazing at knowing how the pattern would turn out and showed us how to make swirls, stripes, star bursts, and even hearts.

Here’s my husband’s tee, in the same swirl as the shirt above.  Then we put on the rubber bands like a pie that has been cut, a pie with three rubber bands to make six slices.  I dyed a different color of dye in each section.

Then it was time to dye.And dye some more.

Even the littler kids were able to dye their own shirts.  They LOVED it.

The hardest part was bagging up our shirts and waiting 24 hours to rinse them out and wash and dry them.

The suspense almost killed the kids.

All of the kids made their Tie Dye Shirts in Red, Blue, and Turquoise on their white shirts.

Come 4th of July we’ll all be sporting our tie dyed shirts at the neighborhood parade.

If you live in Utah County and are interested in having Jen create a tie dye event for you… here’s her contact information.  She provided everything we needed for our fun… including tables, a shade cover… and all the supplies except the shirts.  Her rates are very reasonable.   (PS.  it says St. George on her logo but she lives in Provo now.)

If you want to try dying on your own, there are lots of resources on the web.  Just Google how to tie dye.

Archives


Virtual Quilting Bee