Archive for the ‘sew it’ Category
Dresden Patriotic Bunting
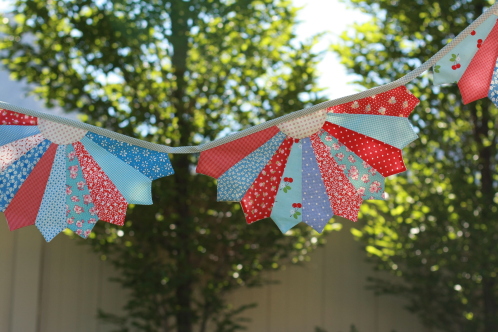
Last week I was looking at the cheerful bunting I have hanging in my kitchen nook. It is spring toned 1930’s fabrics and realized I need something new and fun for summer.
What I really wanted was something that echoed a traditional scalloped patriotic bunting.
Then the idea hit me. A Dresden for a bunting. Yes!
Dresden’s are addictingly fun to make. I use the Easy Dresden Ruler by Darlene Zimmerman and there just happens to be the EZ Dresden Challenge going on right now. Wonderful quilting blogs will be giving away a ruler the rest of this week. You can see the list of blogs here or you can find Easy Dresden rulers for sale here.
Here’s how to make my Dresden Bunting:
My bunting has three Dresden fans. I cut my wedges the full 8 inches, since this was the measurement that fit my window best. You can customize the size and number of fans to suit your fancy.
Start by cutting 10 wedges for each fan (30 in all for 3 fans) of your fabrics of choice.
There are lots of ways to finish a fan. I wanted a backing for my fans out of an inexpensive muslin, to give my bunting a finished look.
So I chose to cut off each side of my point of each wedge at a 45 degree angle. Once I cut one, I used it as a template to easily cut the rest.
Lay out your fans with 10 wedges each.
Using a scant 1/4 inch seam, stitch your wedges together. Make sure they match up at the point end.
Press with the seams all going in one direction.
Lay your fan on top of your backing fabric. I’m using $.99 unbleached muslin from Walmart. It’s so cheap it almost feels like paper : ). But that’s OK for my bunting.
Cut the flat top edge even with your fabric (don’t cut out the 1/2 circle center), then trace around the points of the wedges.
Cut them out.
Layer your fan to the backing, right sides together, and pin.
And stitch around the points of the wedges. Leave the entire top flat edge open.
Clip the point of each wedge.
Clip to just to the seam of each inside point.
Turn it right side out and make each point nice and clean with a chopstick… or a point turner, if you have one. Press your fan well.
I showed how to make a perfect circle for the center of your fan here. In this case, it’s a perfect 1/2 circle. Yes it would have been easy to machine applique my circles in place, but I like the look of doing it by hand… and it really only took a few minutes.
For the binding, you can buy bias tape. Or make your own. I LOVE my Clover bias 1 inch tape maker. It’s easy to use, well-made, small to store, and inexpensive.
I cut my binding fabric on the straight, 2″ the width of the fabric, times 2. That gave me a binding of about 88 inches. Join them together and press it through the tape maker.
Fold your binding in half and press.
Tuck your fans into place and pin. I have a space of 2-1/4 inch between each fan. You can customize this to suit your fancy.
And stitch into place along the edge of the binding.
It will add a cheerful festive feeling to my kitchen all summer… not just for the 4th and be perfect to bring outside for a party.
I just love how it turned out.
Kitchen Table Projects and Giveaway Winners!
My kitchen table is groaning under stacks of fabrics, books, and projects. It’s a good thing my family can eat at our kitchen counter!
I’ve just finished my May Bee’s Knees block for Amy. Just in time for June’s Block.
I’ve also made her a 6 inch block. The blocks don’t really looks like they match seeing them here… but once they’re together in the quilt I hope it’s different story.
I’ve picked up a several pieces of Denyse Schmidt’s Flee Market Fancy reprint. I’m pretty sure I’ll regret not getting more.
The purse I’ve carried for the past few years was made from a different color of this same Flee Market Fancy design in a home weight fabric. The purse now has holes in the corners, is dirty, and definitely worse for wear. But I’m pretty sure I’ll end up washing and patching the corners and using for a while more. It’s not often that I find a fabric I don’t get sick of for years…
Yep, one yard is probably not enough.
The fabrics in this stack will either wind up in a bag or a new apron.
I’ve been pouring over traditional Civil War patterns looking for just the right block to make a Civil War quilt. I’ve been collecting these fabrics since last summer. Lots of my fabrics are not actually Civil War, but since I’m not getting graded on my historical accuracy, I’m OK with breaking the rules. I’d like to finish the quilt before 2015, the 150th Anniversary of the end of the war.
I’m thinking of using an unbleached muslin for the background fabric, and with my fabric choices the quilt will be end up being light and soft.
That’s just a peek of what’s on my messy table today…
And now for the random winners of the $50 Container Store gift card giveaway courtesy of Q-tips.
I know we are not supposed too, but it looks like most of us Q-tips to clean our ears. There were so many great uses for Q-tips in the comments. A few I’ve never even tried.
A big thanks to Q-tips for sponsoring this fun giveaway. I only wish I could have entered!
To April, Joanne, and Joy: Congratulations! Email me at callimakesdo at gmail dot com with your full name and address so we can get your card sent out. And have fun shopping at the Container Store!