Archive for the ‘sew it’ Category
Cluck. Cluck. And Sew a Camera Strap
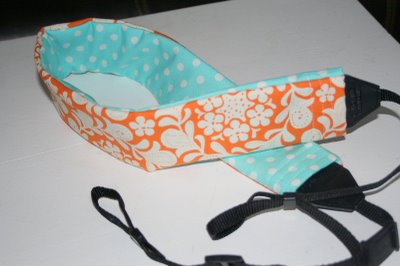
I love Cluck. Cluck. Sew. It’s always one of my favorite blogs to drop in on and find inspiration galore. I’m thrilled to have Allison here today to show us her wonderful tutorial. I wish I had this stylish camera strap on my camera right now. If there’s one thing I’m doing today it’s taking lots of pictures. Take it away Allison…
Hey all you Make it Do readers! I’m Allison from Cluck.Cluck.Sew. and I’m so excited to be here guest posting for Calli while she’s on vacation! Today I’m going to share how to make a cover for your camera strap. Lets get to it!
These are really easy, and make a great gift. They fit any standard DSLR camera strap, (Canon/Nikon) my strap is about 2″ wide. I made mine two sided, but if you wanted just one fabric, just make one strip about 5.5″ wide.
2. Sew the strips right sides together, then press seam open.
3. I made mine padded with Pellon fusible light fleece interfacing. You need about 5.5″by 26″. This is optional of course, I like the feel of the padding, but you can skip this step if you don’t mind the hard strap. Iron on the fusible interfacing according to directions, and trim excess.
4. Fold one end in about one inch, and then again over one inch to hide the seam and make a clean finish.
5. Sew edge down for a clean finish, I sewed three lines, 1/4″ apart so the ends will be more sturdy and it looks more polished.
6. Do the same thing on the other end, the finished strap after the ends are finished will be about 22″ long.
7. Sew right sides together with a 1/4″ seam allowance. If you think the finished cover will be too big for your strap, you can make a wider seam allowance to make the cover thinner. Keep in mind you want the cover about half an inch or so bigger than the strap, so its easy to slide on and off.
8. trim the inside edge seam allowance, it makes more room to slide the strap in and out.
9. Turn inside out (the hardest part) and iron and your done! Slide in your camera strap and viola!
Dear Diary, I need a new Messanger Bag…
I’d like to welcome Amy from Diary of a Quilter. Amy is not only very talented and funny, she’s also a good friend. We met through blogging… but luckily for me our friendship has spanned into real life. Amy and I have more than a few things in common: We both love all things British and Jane Austin. We also both love fabric, Barbacoa Grill, our sewing machines, and being moms- not necessarily in that order. Thank you Amy for sharing your wonderful Messenger Bag Tutorial. I love it’s simplicity and functionality. I also love the Wonderland Fabric you’ve used. I still have some bits of Wonderland in my stash that I’m saving for something special. Maybe it wants to be an messenger bag! So here’s Amy:
You will feel so proud of yourself when it’s done in no time!
For an adult/bigger-kid size bag the fabric requirement are 2 coordinating half yards.
For a smaller child’s bag you will only need two pieces at 3/8 of a yard.
I will demonstrate with the larger bag
and give the measurements for the child’s bag at the end.
First: from both half-yard pieces, cut a 4″ strip off one end.
This will be for your strap.
Cut the remaining piece down to 14″ x 30″.
(You can save the remnant for a pocket, if you want.)
If you are going to put a pocket on, do it now. To make the pocket, fold the remnant in half and sew three sides shut with a 1/4″ seam, leaving an opening to turn right side out. Clip corners and turn right side out. Press, tucking edges in at opening. Fold outside bag piece in half and center the pocket where it will appear on finished bag. Pin in place and sew close to the edge along three sides, sewing opening shut as you go.
Now on to the bag: Place two 14″ x 30″ pieces right sides together and pin together at ends.
Bring the seams to the center and match them up.
Press seams open.
You will now have your lining-piece folded in half on one side and
your outside piece folded in half on the other.
for turning right side out. Sew 3/8″ seams on both sides.
roll the lining fabric above the bag about 1/4″.
Pin to hold fabrics in place and press.
AND at the top of the lining fabric.
and sew down both long sides using a 1/2″ seam allowance.
(This strap is meant to be worn diagonally across the chest.)
For an adult, it’s about the right length as it is.
For an older child, you might want to cut-off a few inches.
If you leave one end with selvage edges on the end you don’t
need to do anything to the strap before you start sewing.
If you cut-off one end, you may want to tuck raw edges under and press.
Now, pinch the end of the strap in half to find the center.
creating a rectangle to secure the strap in place.
Repeat all the same steps.
(You will probably want to shorten the strap.)
We used a heavier, canvas fabric on the cowboy bag.
The other bag is made from the Wonderland by MoMo collection for Moda.
Cheers ta, Calli