Hi, I’m Calli
Welcome! If you enjoy your visit, be sure to follow me:
Oh My Stars!
Canning Day Quilt

Archive for the ‘tutorials’ Category

Crazy for Zig Zags

Zig Zag Pillow from Make it DoI created this zig zag pillow tutorial for a guest post on Ucreate a while back, but I wanted to share it here as well.

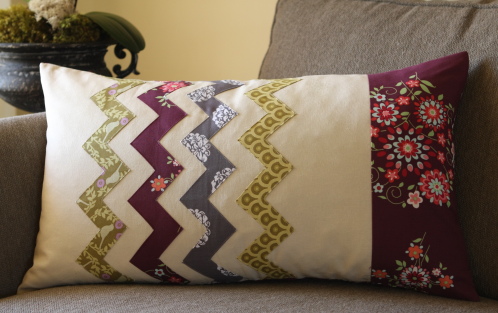
Not long ago, I was strolling through Anthropologie online and noticed a wonderful zig zag pillow that really got my wheels turning.  The zig zags were so fresh: geometric and yet meandering.  I knew I could make something similar that would be a great fit to my home… and much cheaper than the $68 Anthropologie price tag.  My version of their pillow is softer and less modern… and I love how it turned out.  I especially love the technique I figured out for making the zig zags.  It would be easy to adapt this tutorial to embellish a skirt, dish towel, or table runner.

Here’s what you’re going to need to make this Zig Zag Pillow:

  • A pillow form (mine measured 16″ x  26″)
  • Fabric the same size as pillow form for the front (in my case 16″ x  26″)  You might worry this is too small–that I’m not leaving room for seam allowances.  I like my pillows to be firm, so I cut my fabric exactly the same size as the form.  Once I’ve sewn my fabric with a 1/2 seam allowance, it makes the casing 1″ smaller than the form.  When the form is placed inside the casing there is no sagginess…  who likes sagginess? I used a linen fabric for the texture.
  • Fabric for the back.  Since I want to make my casing to be removable and washable, I used two 16″ x 17″ pieces.  This allows for 2″ seams and a 4″ overlap.  My fabric choice was Amy Bulter’s Love Memento.
  • You will need fabric for the zig zags 3″ wide by about 5 inches longer than your pillow for each zig zag.  This gives you some wiggle room to place the zig zags together nicely.
  • I pieced a decorative end cap on my pillow (16″ x 6-1/2″)
  • Disappearing Fabric Marking Pen like a Mark-B-Gone PenZig Zag Pillow from Make it Do

Let’s get started:

Zig Zag Pillow from Make it DoTo make your zig zags, cut your decorative fabrics 3″ wide by how ever long you want your zig zag.  I made my zig zags about 5″ longer than the pillow so I could have some wiggle room when laying them out.

Zig Zag Pillow from Make it DoTurn your strip of fabric to the wrong side and using a ruler and a Mark-B-Gone Pen mark a small dot directly in the center (1-1/2″ in from either side) every 1-1/2″ the entire length of the strip.

Zig Zag Pillow from Make it DoSquare the ruler and draw a line from the left to center, then the right to center, alternating every other marked dot the length of the strip.

Zig Zag Pillow from Make it DoNext cut each marked line.  Be sure to stop exactly at the dot.  (A good pair of scissors is much appreciated here!)

Zig Zag Pillow from Make it DoUsing a very hot iron with the steam turned off (ask me how I know to turn off the steam… ouch!), fold the first triangle back to the outside edge and press.

Zig Zag Pillow from Make it DoPress triangles as shown in the photo.

Zig Zag Pillow from Make it DoContinue pressing all the way down the strip as shown.

Zig Zag Pillow from Make it DoBe sure to make each point as neat as possible.  And once you’re happy with the points, I recommend a little spray starch to keep things in order.  Zig Zag Pillow from Make it Do On the right side, they will look like this.  Space them evenly on your pillow top, and pin them into place.

Zig Zag Pillow from Make it DoAnd stitch into place.  I used a straight stitch down each side.  I also did a little bit of fussy thread matching on my burgundy fabric. It was just too dark to use a chameleon thread like I usually try to get away with.  Once stitched, trim any overhang of zigzag fabric even with the top.

If you are piecing your top, like I did, just be sure the finished dimensions are the same as the pillow form. In my case, my cream linen fabric measured 16″ x 21-1/2″ and my burgundy fabric (Amy Butler’s Love Memento) measured 16″ x 5-1/2″.  Once they were pieced together with 1/2″ seam, it measures 16″x 26″ exactly.

Zig Zag Pillow from Make it Do

Just so you know that nobody’s perfect (well at least I’m not) here is where I cut my fabric wrong.  Actually my design changed along the way… and my linen fabric was cut all wrong.  My dirty little secret is, I pieced my linen fabric back together, and placed a zig zag right over the seam.  Make it Do and nobody is the wiser!

Zig Zag Pillow from Make it DoFor the two back pieces of the pillow, turn a 1/2″ and then a 2″ hem and stitch.  Lay them out right sides together with the top, so the back pieces overlap. Pin front and back pieces together.

Zig Zag Pillow from Make it DoStitch all the way around.  I like to back stitch where the back pieces overlap.Zig Zag Pillow from Make it DoClip the corners and turn right side out.  I love to use a chopstick to make sure the edges are neat.  Give it a good once over with the iron and stuff in your pillow form.

Zig Zag Pillow from Make it DoHere’s a peak at the back.  I love the Amy Butler line.

Zig Zag Pillow from Make it DoAnd here’s the finished pillow. I loved making the zig zags and my new pillow  is a lovely addition to my living room.


Rise and Shine Dishtowel Tutorial

Whenever a new season rolls around, I love to give my kitchen a lift by hanging up a new dishtowel.  It’s a small thing, but it’s always a welcome change.

When I spotted the Farmdale fabrics from Alexander Henry at a local quilt shop it spoke autumn to me.

I just had to bring a few pieces home with me.  I’ve yet to make my oven mitt, from the chicken and eggs fabric… hopefully it will happen this week.

Here’s how I created my “Rise and Shine” Dishtowel:

You can start with a pre-made dishtowel or you can make your own:

I used a home-weight cotton fabric from Denyse Schmidt.  I love this yellow fabric… I want to track down more of it to cover my ironing board, since my current cover in falling to pieces.

But this small piece is my new dishtowel, I cut my fabric 18″ x  26″.

In each corner of the fabric, mark a 2″ square, using a disappearing fabric marking pen.

Fold the corner of the square to make a triangle and press.  Press a 1/4″ and then a 1/2″ hem, as shown.  Repeat all the way around, so that each corner comes together to create a mitered corner.

Clip the corners that stick out from the hem.

It should look like this.

Stitch all the way around, except the bottom, leave that so that you can add your trim.

I pinned my trim into place, carefully tucking and pinning either end under the hem on the back.  Stitch into place.  Depending on your trim, you may want to match the tread… especially if you are using rick rack.

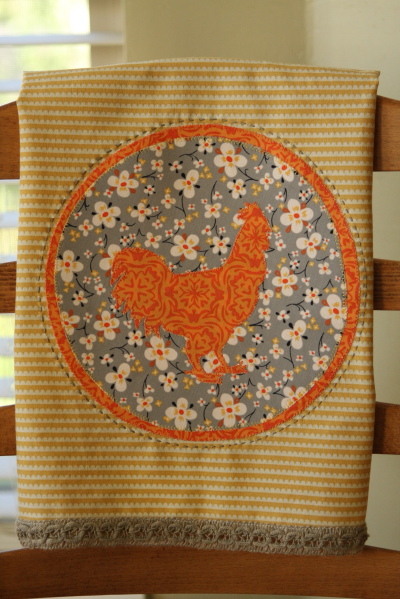
Don’t you just love this trim?  It’s the color of driftwood… quite lovely.Next I traced my rooster onto Heat ‘n Bond.  You can also use Wonder Under.  If you like the rooster I used, here is my simple pencil drawn template.  Remember that whichever direction you trace your template it will be reversed on your towel.Press the template to the BACK side of your fabric.  Just a friendly reminder, since more than once I’ve pressed Heat ‘n Bond to the front of something.  Ick, my fabric looks pink from the back.  Good thing it’s not.

Carefully cut out your rooster.

I used a bowl to trace the 8 inch circle for my gray medallion.  I also used the Heat ‘n Bond.

Remove the backing from the rooster, center it on the gray medallion and press into place.  I had planned on stopping right here with my design, but it was pretty bland.

So I added a second orange circle with the fabric I had left over, also using Heat ‘n Bond.  I centered the medallions 2- 1/4″ up from the trim.  Press into place.  Using matching thread, I machine blanket stitched around the rooster and medallions.

But it still didn’t feel quite zippy enough.  So I embellished around the medallion using gray embroidery thread in a running stitch.

Bingo.  That was just what it needed.

And it looks so lovely in my kitchen.  I love projects that are so quick and easy.

Archives


Virtual Quilting Bee