DIY Laundry Soap
Have you ever made your own laundry soap?
I had been wanting to for a while and this summer, when I ran out of my usual detergent, I finally got around to it.
My criteria for good laundry soap was a powdered soap that needed to work really well, I wanted it be as earth-friendly as possible, and it need to be cheap.
Summer was the perfect time to try out a new detergent. My summer laundry is D-I-R-T-Y. Dripping chocolate ice cream cones, sweat, mud, campfire smoke, and grass stains are just a few challenges for our soap trial.
I looked around for a recipe that looked right to me and found a great recipe at a site called Great Oak Circle. She even stores her soap in wonderful mason jars and shares a very cool printable label.
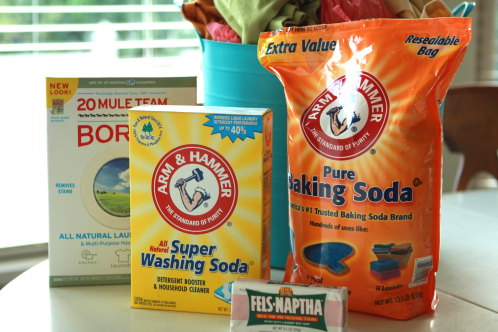
The ingredients in the recipe were all things I already use in my laundry already- Borax, Fels-Naptha, Baking Soda and Washing Soda. All the ingredients are easy to find inexpensively at my local grocery store.
I used my Microplane to grate the Fels-Naptha soap. It worked like a charm and I liked that the pieces of soap were grated small. Fels-Naptha doesn’t have a perfect environmental score, but it’s not too shabby either. And it’s awesome at taking out stains.
One quick Fels-Naptha tip: I use a bar for getting out stains in my laundry. It really works better when the bar is a little wet. So I bought a small dish (from a cooking store) and when I start laundry I put a little water in the bottom of my dish. Then I stick one end of the soap in the water. When I come across stains it’s wet and ready to work. When I’m done I dump the water out (usually on the stains) and use the dish to store my soap.
The dish looks cute in my laundry room and keeps my bar of soap nicely.
Speaking of looking cute in my laundry room, the detergent tin I made from an ammo box over a year ago is still one of my favorite things. It’s perfect for storing my homemade soap.
After a good trial, the results of my detergent are in. I love homemade laundry soap! It’s much cheaper than my old detergent. I only use 2 tablespoons in my HE washer and my laundry is clean and smells really nice. I love that I know all the ingredients in it and that it’s mild for the environment and my family. You can even add a little essential oil to your soap to customize your laundry scent.
It doesn’t take long to make months worth of soap and is well worth it. Plus there something about making your own laundry soap that is very satisfying.
If you make your own soap, I’d love to hear your favorite tricks and tips. If you’d like to try making your own soap, here is a link to the recipe on Great Oak Circle.
New School Lunch Boxes
My kids started school yesterday. I watched them climb the steps of the school bus with a great twist of my heart. I am not ready for them to go. They are growing way too fast.
But like it or not our summer is over and my kiddos are another grade older.
Since my girl’s school bags that I made last year are still in great condition, I decided to try my hand at making lunch bags.
I was inspired by the cute and easy oilcloth lunch sack tutorial on Martha Stewart. But after looking more closely at the sack, I thought the clothes pin closure wasn’t ideal for kids. I also decided we needed lunch bags with insulation to keep things like cheese sticks and yogurt cool.
I found a free simple bag pattern on the Long Thread that fit the bill perfectly.
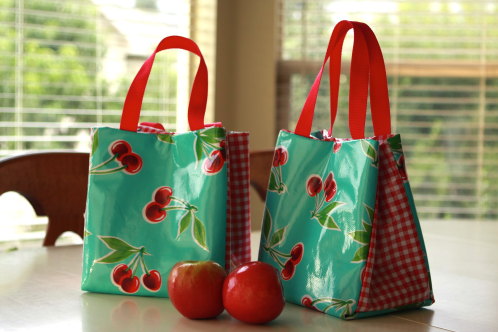
I made a few small changes to the bag. Instead of using canvas on the outside, I picked a cheery aqua cherry oilcloth fabric and a red check oilcloth for the sides and inside.
I did do a little reading about oil cloth for lunch sacks. It isn’t recommended for children under 12, but I decided to take my chances. Oilcloth is made from linseed oil and the real danger would come from your child sucking on the fabric. I’m pretty sure we are safe in that department. Plus all my girl’s food is in containers.
I also used an insulated batting, which has a Mylar in the center. It’s the perfect batting for keeping a lunch cool. I also changed the pattern by adding batting to the sides of the bag, in addition to the center.
I debated whether to add a flap, but decided the magnet closure called for in the pattern would be enough.
The girls and I love how their bags turned out. They aren’t perfect, the bags are slightly bigger than I thought they would be, which is good and bad. One other change I’d make is, in retrospect, I would have used canvas for the outside like the pattern calls for. The oilcloth was a challenge to work with. It’s so stiff and inflexible. It almost led to swearing when I had to turn the bags right side out. I also think the canvas would dry out easier if there was ever a spill that made into the batting.
One other quick, fun thing to share is the great reusable Lunch Containers we found. They open up to hold a sandwich and two other items all separated. The containers are BPA free and seem to be well made. My kids love that they are easy to open. We bought a few other smaller containers from the same company. I’m still on the lookout for a small, leak-proof container to hold their dips and dressings. I thought about baby food containers, but I’m pretty sure sending a glass jar to school is not the smartest idea. If you have any ideas, I’d love to hear.