Hi, I’m Calli
Welcome! If you enjoy your visit, be sure to follow me:
Oh My Stars!
Canning Day Quilt

Posts Tagged ‘make it do’

Review: Slice Fabrique from Making Memories
The Blogger’s Quilt Market Meetup is just around the corner and we are pleased to have Making Memories and the Slice Fabrique as a sponsor for the event. A few days ago, I received a surprise package on my door step. The wonderful folks at Making Memories were kind enough to send me a Slice Fabrique and accessories to review prior to the Meetup.

This spring has been so busy that my poor sewing machine is feeling quite neglected, so I couldn’t wait to pull out some fabric and give the Slice a try.

For those of you who aren’t familiar with the Slice Fabrique, it is a digital fabric cutting tool. What you see in the photo is the Slice Fabrique along with the Hands Free Kit, which comes with a 12″ x 12″ tempered glass cutting mat and a magnetic collar. The Slice Fabrique Starter Set comes with a smaller 6″ x 6″ tempered glass mat and requires hands while it cuts.

After getting all the fun toys out of the box, my first impression of the Slice Fabrique is that it seems very well made and solid. There is an attention to detail and a quality which really impressed me. But how does it work? After a quick read through the quick start guide I was ready to get started.

The first step is to plug it in to charge. Since I am impatient, I didn’t wait for it to charge, but used it plugged in. Having a cordless option is very nice.

The next step was preparing the mat with a little Repositionable Spray Adhesive. I went straight for the spray can, but you can use the foam brush and liquid adhesive too. The one time spray was sticky enough for multiple cuts in one sitting and when I was done it wiped easily off the mat with a cloth damp with water.

Last but not least, prepare the fabric by ironing on a fusible web product like Heat ‘n Bond Lite to the back side of your fabric… just like I would for most applique projects. I used the Slice Fusible Web, but I think any fusible web would work. On my next project I want to see if freezer paper works, for times when I don’t want adhesive on the back of my fabric.

It wasn’t long before my girls were looking over my shoulder and bending down to look through the clear casing to watch the Slice as it cut the fabric.

When it finished its first cut and I took the Slice off the mat, they both said, “Oh it didn’t work!” Then they both said, “Jinx.” “Double Jinx!!” “Triple Jinx!!!”……. don’t you just love 3rd graders? But when I got out the spatula and began to remove our butterfly… they were impressed and seriously excited.

After that it was a mad scramble to look through all the design cards and a lot of brainstorming about the projects they want to do. I must admit to feeling the same way. The cut was crisp and clean. And it was fast. This could be addicting.

The Slice comes with a Basic (but generous) Design Card that includes an alphabet with numbers, lots of iconic shapes like leaves, butterflies, flowers, vehicles, fruit and vegetables… and more.

In addition to the Basic Design Card, you can purchase additional design cards which makes the possibilities with the Slice Fabrique endless.

The design cards look similar to a camera’s memory card… and are just as easy to insert.

Here is an example of a few of the cards. My girls especially love Animal Frenzy:

My personal favorite is the frog. It would be so fun to use these to embellish a school bag or make a quiet book for a toddler. How about making a patch for a torn out knee? A little boy would love a puppy dog patch or an alligator. Oh my! I can envision lots of embellished tee-shirts too. An embellishment is a great way to cover a set in stain… talk about making lemons into lemonade!

I also love the Spring design card:

It was the first card I tried in fact, to make the butterfly to embellish a plain white tee-shirt.

In a matter of half an hour, I made about 10 perfect butterflies… even while learning how the Slice works, trying different fabrics and playing around with spacing.

This brings me to my one complaint about the Slice. I like to squeeze blood out of a turnip, and with fabric, I know how to maximize every inch. But with the Slice I had a little more fabric waste than I would have liked. Try as I might, I couldn’t figure out where the Slice would start cutting, so I was limited to cutting one shape out of about a 5″ x 5″ piece of fabric. That’s not a lot of waste, but much more than if I were cutting by hand.

I am confident with a pair of good, sharp scissors and some Heat ‘n Bond Lite or freezer paper, and a template traced in a sunny window. I can cut pretty intricate designs quite cleanly. But I have friends for whom fine cutting is a real challenge… and projects like making my Advent Calendar Pattern (with all the fine cutting of the numbers) is a little daunting. So the Slice Fabrique would be a great option for anyone who isn’t comfortable cutting by hand, but wants to stretch in their applique projects. It is also is nice for someone like me since, once you get the hang of it, it’s faster (and more accurate) than by hand… and there are a lot of fun template options.

Speaking of my Advent pattern, I was thrilled to see the ‘Tis the Season Design Card. There are more than enough templates to make a different small ornament for each the 24 Advent days. Another nice thing about the Slice is you can select the size of your design up to about 1 to 4 inches.   SO COOL! It would be easy to make the ornaments less than 2″ so they fit in the Advent pockets.  The Slice Fabrique would make short work of all that tracing and cutting. The Slice says it cuts through thicker fabrics like wools and felts, and I can’t wait to give it a try.  When I do, I’ll be sure to post an update as to how it works.

In no time at all, I finished a darling embellished tee-shirt finished for my girls. I stitched around the butterflies using a small blanket stitch on my machine and added a little button for fun.

It’s the first of many projects and after Market, when I have a little more time, I’ll be sure to post an update.

UPDATE:  I know for sure the Slice Fabrique is available for purchase at Oh My Crafts.

Remake: Old Lampshade to Fabulous Chicken Wire Basket

Last month I was a guest on Ucreate making this wonderful chicken wire basket out of an old unused lampshade.  I am reposting it on Make it Do so I have it in my archives.  If you missed it on Ucreate… you are in for a treat.  This is a fabulous project… easy and recycled (ie. cheap), this Chicken Wire Basket has lots of charm.

*******************************************************

I was walking down the aisle of my local hardware store the other day and spotted a roll of chicken wire.   Somehow it made it into my cart despite not having any idea of what I could do with it.  Maybe it was because chicken wire fits into the category of mason jars and clothespins for me.  Practical and homey… with a timeless charm that I love.

Just so my purchase wasn’t made in vain, I set my mind to looking for the perfect project.  My first thought was to make a bird’s nest lined with moss.  But then I spotted a chicken wire basket in a decorating magazine and thought “I can make that…”

First, I needed something to serve as a mold for my basket.  After a scavenger hunt through my basement, I spotted an old lampshade.  Taking a closer look, I realized it had a heavy wire frame under the fabric cover.  Sorry for the pun, but Lightbulb! With its great flared shape, it would make a lovely basket.   I just love giving old things new life.

After a little deconstruction with scissors pulling off the fabric, my frame was ready for chicken wire.  I left the top fitter wire in place on the frame, since it would have needed a small saw or some other nonsense to remove it.  Plus I could always use it as a lampshade someday.  Right?

A word to the wise:  you will want to wear leather gloves and eye protection for this project.  Chicken wire can be very sharp!

I laid the frame on it’s side, on top of the chicken wire, to use as a guide and clipped around it using wire cutters.  Using needle nose pliers (my husband will say they are actually duckbill pliers)  I twisted the wire ends around the frame on the first side.

I repeated the process on the opposite side.  Yes, I was reckless. I didn’t wear my gloves… and have a few scrapes to show for it.

As I wrapped the wire, I made sure to pull the wires tautly.

For the final two sides (which were opposite each other on the frame) I used one long piece so that the chicken wire covered the bottom and both sides.  Again I laid the frame right on top of the wire to use as the guide to cut my wire.  Remember when cutting your wire, you can always take some off, but you can’t put it back on.  When in doubt, cut a little bigger.  I ended up trimming off some of the wire as I wrapped the final side.

After I was done, I went around the entire basket with my pliers, carefully squeezing any loose or sharp ends.

And the results…  I just love projects that work like a charm.  But it wasn’t quite done yet.

So I picked out a can of spray paint.  I almost went with a cornflower blue… but the versatility of antique white won out.  Rusty brown or black would have been nice too.

I was right, antique white is perfect for spring.

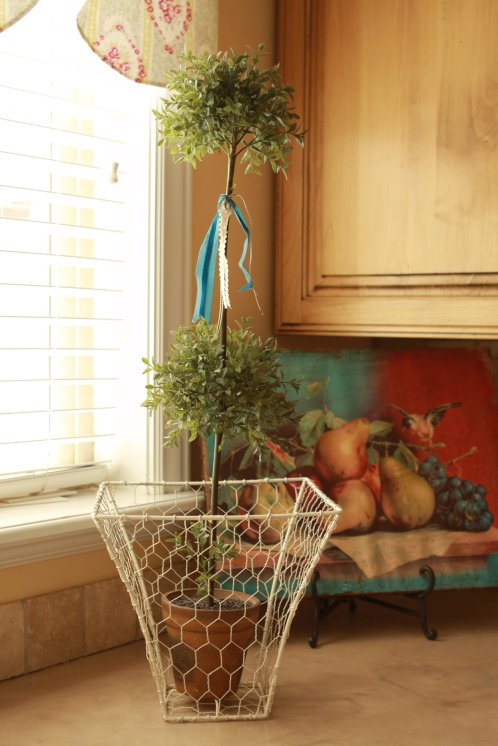
It also looks fabulous with the topiary.

It is even cute as a small waste basket in my guest bathroom.

All in all this was a fun and inexpensive project that only took me a few hours to complete.  So next time you run across an old lampshade, don’t throw it away!  Introduce it to some chicken wire and make it into something really lovely.

Archives


Virtual Quilting Bee