Archive for the ‘sew it’ Category
More Bees Knees – Blocks for Sinta
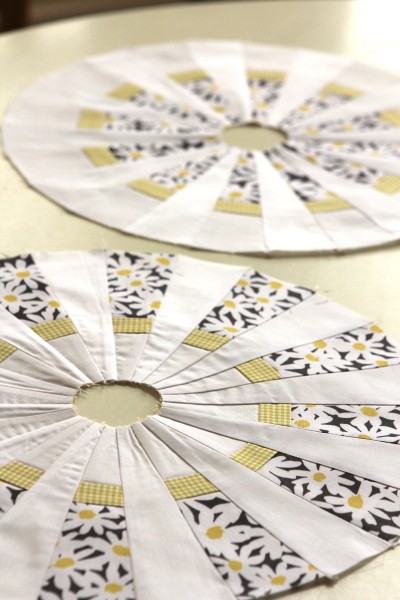
I finished my Bee blocks for Sinta. It’s a modern Dresden… destined to be an octagon, with an octagon center. Super fun!
Since you are turning the ruler in alternating directions, you get two blocks from the same pieced strip. I always like when you get a two for one.
I definitely struggled a little with this block at the end. My Dresdens were a bit cone shaped, you can see, one more than the other. I got them to lay more flat with some pressing, but they still aren’t perfect.
Does that mean I need to work on the accuracy of my scant 1/4″? Probably.
A good friend of mine said, don’t worry about it too much, as long as they are smaller than a “C” cup, once quilted you will never know. I hope for Sinta’s sake that is true.
Virtual Quilting Bee – Block #5 Tutorial
Welcome! I’m so happy to be hosting the Block #5 tutorial for the Virtual Quilting Bee hosted by my dear friend, Amy Smart of Diary of a Quilter. I am honored (and a little humbled) to join such wonderful quilters in contributing a block.
If you are visiting for the Bee, I’m glad you dropped in! Feel free to stay a while.
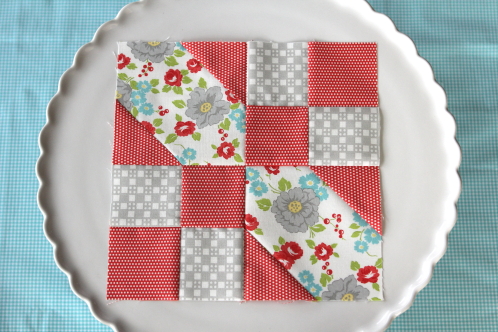
It was so fun to create my block in both Kona Solids by Robert Kaufman (ooh how I loved my blue pallet), and a block using Happy Go Lucky, by Bonnie and Camille for Moda. Happy Go Lucky makes me feel just that – happy.
Isn’t it cool to see how different the blocks turned out using the solids verses prints? I really enjoyed finding a block design that would look great with both.
This is such a fast and easy block, you’re going to be done in a jiffy.
OK, let’s get started!
Remember that your finished block will measure 8-1/2″ unfinished and 8″ finished. All seams are scant 1/4″ seams unless otherwise noted. For the demonstration I’ll be using Happy Go Lucky.
Cutting instructions:
Red Polka Dot
- Cut one 2-1/2″ x 10-1/2″ strip
- Cut (4) 2-1/2″ squares
Gray Check
- Cut one 2-1/2″ x 10-1/2″ strip
Floral
- Cut (2) 4-1/2″ squares
Sew red polka dot strip to gray check strip along long edge. Press seams to red polka dot.
Cut into (4) 2-1/2″ strips. (Sorry folks for only showing two cut… keep going!)
Make two (2) four patches. Set aside.
Using a very sharp pencil (I prefer a mechanical pencil), draw a line from corner to corner on the wrong side of the 2-1/2″ red polka dot squares.
Sew directly on the drawn line, as shown, on opposite corners of the 4-1/2″ floral squares.
***Tip- when sewing on the drawn line, I find it helps my accuracy to sew one thread width toward the corner.
If you are ever making lots of blocks where you sew corner to corner, be sure to check out my tutorial for taping your machine. It’s super fast and easy, and you don’t have to mark your fabric.
Fold back the triangle, matching corner to corner, checking for accuracy and press.
Trim away back triangle. Repeat for other side. Make 2.
Lay out your block as shown.
Sew top two blocks together and bottom two blocks together, making sure to match the seams. (You can pin at the seam if helpful.) Press seams toward the 4 patch.
Sew together rows and press to one side.
Easy peasy! Be sure to add your finished block to the Virtual Quilting Bee Flickr Group.
And here’s the block I made for my Bee quilt from Marmalade by Bonnie and Camille for Moda.
I hope you enjoyed making your block. If you have any questions, leave me a comment or drop me a line at callimakesdo at gmail dot com.
If you haven’t gotten started, and want to, you can learn more about the Bee by clicking here.
And here are links to the first 4 blocks:
Block Tutorial #1 by Sherri of A Quilting Life
Block Tutorial #2 by Amy Newbold of Sukie Don’t Ya Know
Block Tutorial #3 by April Rosenthal of Prairie Grass Patterns
Block Tutorial #4 by Melissa Corry of Happy Quilting
Thanks Amy for organizing this awesome Bee!