Hi, I’m Calli
Welcome! If you enjoy your visit, be sure to follow me:
Oh My Stars!
Canning Day Quilt

Fruit Pizza Minis


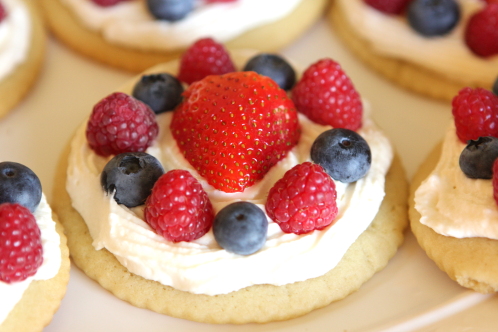
Summer raspberries are in full swing here.  So when deciding on a dessert for a luncheon last week, I wanted fresh berries to be the star.

I’ve made fruit pizza before, but these mini versions are my new favorite.

The recipe comes from my Great Aunt Evelyn (the same Aunt that shared my favorite dishcloth pattern).  This cookie was served at her granddaughter’s wedding.  I’ve modified her recipe in several ways, changing the orange zest to lemon zest, cutting the recipe in half (it was wedding size!), and adding lemon extract.   I thought the lemon in the sugar cookie base was a perfect compliment to the light topping and fruit.  Plus I love lemon zest more than words.

Both pretty and delicious, these fruit pizza minis are perfect for a wedding, a luncheon, or a party.

The topping is a combination of a butter and cream cheese frosting gently folded together with whipped cream.  It’s light tasting and totally delicious.  Fresh berries on top make this a perfect summer dessert.

Because it was easy, and made them look pretty, we piped the topping on with a pastry bag and a star tip.  The nice part was they didn’t need to be perfect since the topping is covered in fruit.

Here is the recipe:

Fruit Pizza Minis

  • 2 cups butter, softened
  • 2 – 1/4 cup sugar
  • 3 eggs
  • 2 teaspoon vanilla
  • 1 teaspoon lemon extract
  • 1-1/2 teaspoons milk
  • 3/4 teaspoon salt
  • 1 tablespoons plus 1- 1/2 teaspoons baking powder
  • 1-1/2 tablespoons lemon zest
  • 6 cups all-purpose flour

Cream together softened butter and sugar until light and fluffy.  Add eggs one at a time.  Add vanilla, lemon extract, and milk.  Add salt and baking powder and mix until well blended.  Add lemon zest.  With mixer on low, add flour in batches and mix until just incorporated.  Do not over mix.

Wrap dough in plastic wrap and chill for one hour or up to overnight in the refrigerator.  Roll out on a floured surface to 1/4 inch thickness.  Cut with desired cookie cutter.  (My great Aunt and her girls used the mouth of a large peach can.)  I used a 3 inch round cookie cutter, and it made just over 3- 1/2 dozen cookies.  Place on a greased cookie sheet.  Don’t over-crowd as they will spread slightly.

Bake at 375 degrees for 8 to 10 minutes.

For the topping:

  • 1/2 cup butter, softened
  • 4 oz. cream cheese, at room temperature
  • 3-1/2 cups powdered sugar
  • 1 teaspoon vanilla

Whip ingredients together until light and fluffy and set aside.

  • 2 cups whipping cream
  • 1/3 cup powdered sugar
  • 1 teaspoon vanilla

Whip cream together until slightly stiff.  Add powdered sugar and vanilla and whip to stiff peaks.

Gently fold together with cream cheese mixture until combined.

Frost baked and cooled cookies.  Top with favorite fruit.


Share and Enjoy:
  • Digg
  • StumbleUpon
  • del.icio.us
  • Facebook
  • Twitter
  • Google Bookmarks
  • Google Buzz
  • Yahoo! Buzz

Pickledish Progress

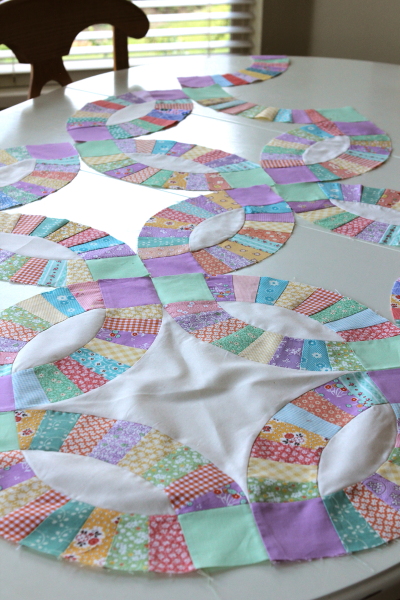
The pickledish blocks from my Bees Knees Bee partners have been arriving in the mail.  Thank you Bee friends!  It’s so fun when your packages arrive.

This quilt is going to be so awesome!

I’ve had multiple requests to share the revised arc template that I created from Aneela Hooey’s original free template.  The lines I added made the paper piecing much easier for me.

I contacted Aneela and she graciously gave permission for me to share the template here.  You can download it by clicking here.  You can find the rest of the templates to make Aneela’s pickledish and her wonderful tutorials on her blog comfortstitching.

Share and Enjoy:
  • Digg
  • StumbleUpon
  • del.icio.us
  • Facebook
  • Twitter
  • Google Bookmarks
  • Google Buzz
  • Yahoo! Buzz
Archives


Virtual Quilting Bee